The Floating Loft Bed

Girl #2 doesn’t like to keep her room clean, especially under her bed. So, I figured the best way to get her to keep under her bed picked up, was to raise her bed off the floor! After looking at online pre-made options and not finding something I liked, I decided to build her a Floating Loft Bed. See the full gallery here for those that want to just browse the photos.
I browsed Pinterest for inspiration and saw several I liked - different aspects of them. But I finally just decided to follow this plan from Our Paleo Life. She had outlined the parts I would need and where to find them and her descriptions seemed easy enough to follow. Here’s my take on her plan:
Supplies:
(7) 2 in. x 4 in. x 104-5/8 in. Stud
(2) 2 in. x 6 in. x 104-5/8 in. Stud
(1) 1 in. x 2 in. x 104-5/8 in.
(4) metal corner angles
Wood screws (2 in. and 3 in.)
(2) 7/16 in. x 4-3/4 in. Zinc-Plated Spring Link
(2) 3/8 in. x 4-7/8 in. Stainless Steel Screw Eye
5/16 in. x 1 ft. Zinc-Plated High Test Chain (I used 25 inches and had left over)
(9) 1/4 in. x 4 in. Zinc-Plated Hex Lag Screw
(4) 5/16 in. x 5-1/2 in. Zinc-Plated Hex Lag Screw
I had wood screws left over from when I built the deck, and the 1x2 I also had floating around. Her plan had the slats as 1x4, but I didn’t read that very closely and ended up getting 2x4 instead - I liked that because it gave more stability to the mattress (since there wasn’t a box spring)

First, building the frame out of the 2x6 studs.

Adding the support for the slats with the 1x2 (long side only)
The bed is a twin, but I wanted the frame to be slightly larger all around - mostly because if Girl #2 brought up toys or small objects up to her bed, then they would fall to the ground instead of being wedged in between her mattress and the wall! This is also the reason I opted for slats instead of a plywood base.
I cut the 2x6 about 4 inches longer than the mattress, and the width part also gave a 4” extra space. This would mean that (in theory) 2” would be extra around the mattress and the frame. I used wood screws to connect the short ends to the long (using a square to make sure the corners were 90 degrees) and then added the 1x2 to the inside bottom of the long sides. I really debated on how to attach the slats - at first I planned to screw them directly into the frame, but since I was planning on painting before hanging, I thought all of those slats (there were going to be 13-15 2x4s) was really going to add weight and would be too tough to hold up while screwing the frame to the wall. So, I scrapped that and went with the runner supports instead.


I decided to paint the frame before hanging it - it seemed easier that way. I did end up having to touch up when the blue slats were slid into place, but at least I didn’t have to paint the whole thing while it was hanging and risk getting paint on the floor.


The corner where the bed will be hung. This was the only corner in the room to do this - the other corners had the closet, the door, or a window in the way.

Finding the studs in the wall…
Before I hung the bed, I drew a line on the wall 33” from the ceiling. This was what Our Paleo Life had done and it seemed to be a good measurement. But once it was on the wall, it seemed too low. Girl #2 would have so much head room - and while that was good for her, it really limited what could be done UNDER the bed. My ceilings were only 7’ high, so I had to use all of the real estate. But I called in Girl #2 to look at it and told her that right now, the top of her mattress would be slightly higher than the line - did she like that? She opted to put the bottom of the frame at the line - she’d lose about 6”-8” of head space, but gain that much for walking under her bed.
Once that decision was made, I set to work finding the studs. I stuck push pins in the middle of each stud (using a trusty stud finder that was sometimes not very accurate - but it gave me a good starting place!).

Temporary support beam
All screwed in!
My sister helped me with this part - she held up the corner that was in the middle of the room while I screwed the lag bolts into the frame and into the stud. I used the 5-1/2” long ones in the corners and the rest down the wall. On the last studs closest to the edges of the bed, I screwed in 2 lag bolts for good measure and added strength. We screwed in an extra 2x4 in the “floating” corner to help support that as I got ready to get the chain.


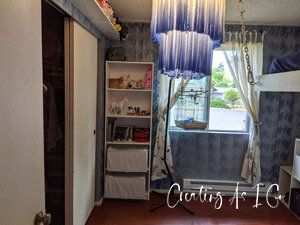
Finally I needed to figure out a way for Girl #2 to get to the bed… I didn’t want a ladder, but the space I had to work with was really tight. I explored steps/boxes (and even thought about IKEA hacks), but nothing pre-made was going to fit. So I set to work building my own custom-fit storage steps out of left over siding. Painted it white, put in fabric boxes, and then screwed the whole thing into the wall. It’s some steep steps, but at least she can get to her bed!


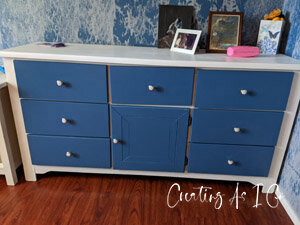
We painted her dresser to match her colors, installed power and a small shelf above her bed, put some cool LEDs underneath, and built a long shelf to hold all her stuffies - Girl #2’s bedroom was finally done!